Bocada Cloud’s connectors to backup applications use either an API or direct database connection approach to collect all available backup data. However, Veeam Data Cloud for M365 does not provide an API. So, Bocada Cloud collects backup data from it through email parsing of the emails sent by the application. To configure that option, follow the steps below.
Create the Veeam Data Cloud for M365 connection in Bocada Cloud
- Log into Bocada Cloud and from the left navigation menu, select Connections and +Add.
- Select Veeam Data Cloud for M365 from the list of applications.
- Create a name for the connection that will display in the Bocada Cloud UI.
- Select the time zone where the backup system resides.
- Click the Next button.
- You will see a unique email address to use when configuring Veeam Data Cloud for M365 email settings. COPY this email address. You will need to use it as the recipient email address for the backup emails sent by the Veeam Data Cloud for M365 application.
Configure Veeam Data Cloud for M365 email notifications
1 - Log into the Veeam Data Cloud application.
2 - Under the Workloads tab on the left navigation menu, select Microsoft 365
3 - Select the tenant you want to collect M365 data from.
If you want to collect M365 data from more than one tenant, you will need to repeat the steps in this article. You will need one connection per tenant.

4 - Select "Reports" under the Overview section as in the screen shot below.
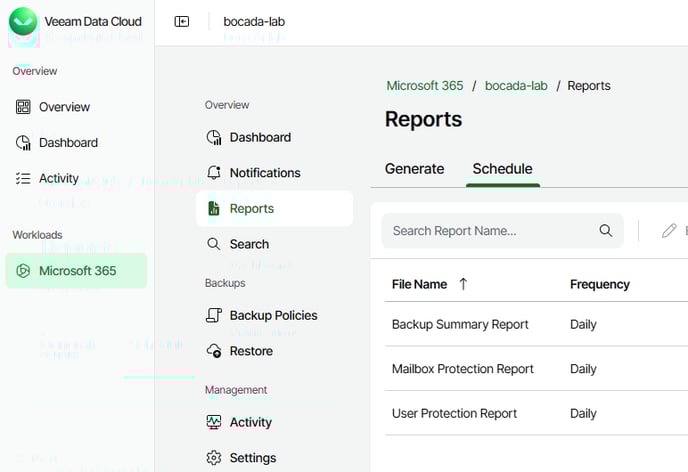
5 - Click the "Schedule" tab
6 - Click the green "Schedule Report" button to add a new scheduled report.
7 - Report Type: Select the either the "Mailbox Protection Report" or the "User Protection Report" option.

Note: if you want to see data from both of these reports in Bocada Cloud, then add a scheduled report for one of them, and then a second scheduled report for the other one. You can use the same Bocada Cloud email address you copied from the Bocada Cloud UI for both.
8 - Report Name: Enter a name for the Report.
9 - Frequency: Enter a report Frequency. We recommend "Daily."

10 - Recipients: Paste the Bocada Cloud email address you copied from the Bocada Cloud UI into the recipient email address field.
11 - View the summarized information for the scheduled report you created, and then click the Finish button. Note: by default, the emails will be sent at midnight UTC unless changed by your organization.
View Veeam Data Cloud for M365 backup data in Bocada Cloud
After you configure the connection, emails with Veeam Data Cloud for M365 backup data should start being sent at midnight UTC. Bocada Cloud will ingest those email messages, parse the data and display it in dashboards and reports such as the Job Activity report.
If you have issues with Veeam Data Cloud for M365 after trying these steps, create a Support Ticket in Bocada Cloud, or contact us.