Bocada Cloud’s connectors to backup applications use either an API or direct database connection approach to collect all available backup data. However, Veeam Agent does not provide an API. So, Bocada Cloud collects backup data from it through email parsing of the emails sent by Veeam Agent. To configure that option, follow the steps below.
Note: if you have Veeam Agents installed on multiple machines, you will need to follow the steps below for each one.
Create the Veeam Agent connection in Bocada Cloud
- Log into Bocada Cloud and from the left navigation menu, select Connections and +Add.
- Select Veeam Agent from the list of applications.
- Create a name for the connection that will display in the Bocada Cloud UI.
- Select the appropriate time zone of the machine where the Veeam Agent is installed.
- Click the Next button.
- You will see a unique email address to use when configuring Veeam Agent’s email settings. COPY this email address. You will need to paste this into the Veeam Agent application as explained below.
Configure Veeam Agent email notifications
- Log into the Veeam Agent application and click on the three lines in the top left corner to expand the left navigation menu.

- Click “Settings”

- Under “Notifications” click the link “Configure and Test”

- On this screen, you will see fields that specify how the Veeam Agent will connect to your email server (“Mail Server”), and where the emails will be sent ("Email Settings").

Mail Server Settings
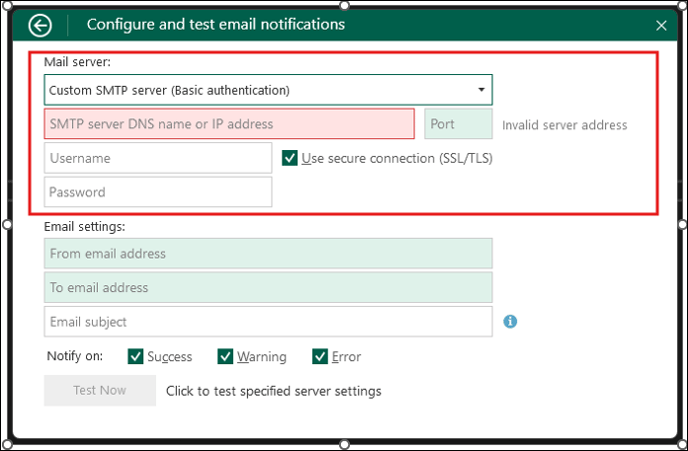
- Bocada recommends using the "Custom SMTP server (Basic authentication)" from the first drop-down menu.
- SMTP server DNS name or IP address: This is the address of your email server. It often looks like smtp.yourcompany.com. Contact your IT team to confirm the correct server address.
- Port: This is the connection port used to access the email server. Commonly used ports are 587 or 465. If unsure, check with your IT team, or start with 587, as it’s the most widely used.
- Username: This is the email address that will be used to send the Veeam Agent email messages.
- Password: This is the password used to log into the email account of the username specified above.
- Use secure connection (SSL/TLS): This ensures the email connection is secure. It is recommended to check this box, as most email providers require a secure connection.
Email Settings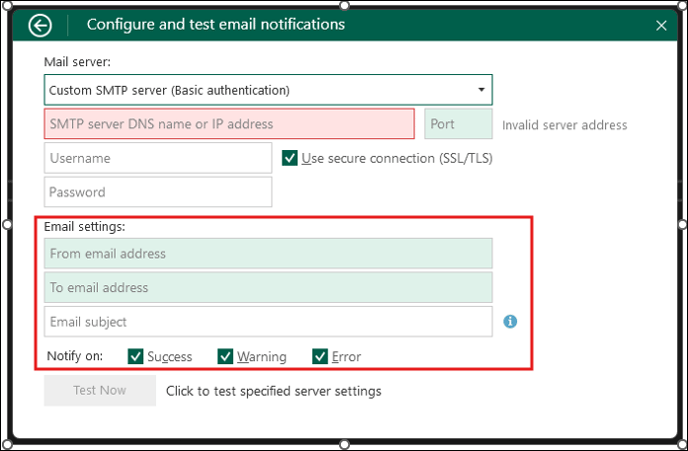
- From email address: This is the email address that will appear as the “sender” in outgoing emails. It is usually the same email address as what was entered into the Username field above under "Mail server."
- To email address: this is where you will PASTE the Bocada Cloud email address you copied when setting up the connection to Veeam Agent. It follows the format of:
backups+[connection_id]@bocada.com
For example: backups+01234-56ab-7cde-f89g-hij10klm@bocada.com- If you forgot to copy the unique Bocada Cloud email address for your Veeam Agent email notifications, you can find it by going to Bocada Cloud. From the left navigation menu, select Connections > List. Edit your Veeam Agent connection (click the pencil icon) which will display the unique email address on the Veeam Agent connection details page.
- Email subject: The Veeam Agent may auto-fill this subject line. If it does not and it's blank, COPY AND PASTE the following string into this field. Veeam Agent will replace the tags with the relevant information:
[%JobResult%] %ComputerName% - %JobName% - %CompletionTime% -
Notify on: Bocada Cloud needs to monitor all statuses, so check all of these boxes.
The completed screen should look something like this:

Testing the Configuration
After completing all fields, click the Test Now button. This will verify if the settings are configured correctly.
- A “Success” result indicates the setup is complete.
- If a “Warning” or “Error” appears, double-check the entered information or consult your IT team for assistance.
Once the configuration is complete, the Bocada Cloud email parsing service will start processing incoming mails Veeam Agent on the scheduled intervals and display the data in your reports and dashboards.
If you have issues with Veeam Agent after trying these steps, create a Support Ticket in Bocada Cloud, or contact us.