You can monitor and report on your IONOS storage utilization and cost data by connecting it to Bocada Cloud through the IONOS REST API. The connector will collect point-in-time storage capacity, consumption, costs, deduplication & compression rates, Immutability, retention locks and encryption settings.
Data collected will populate standard Storage reports and can be viewed alongside storage data from additional products.
To create the connection, follow the steps below.
1 - Login to IONOS Cloud Portal (Data Center Designer)
You will need to gather some information from IONOS to configure the connection with Bocada Cloud. Login to the IONOS Data Center Designer (DCD) at: https://dcd.ionos.com/
A - Verify the IONOS Endpoint URL
You will need to identify the Endpoint URL of your IONOS region to set up the connection, e.g. https://s3.us-central-1.ionoscloud.com
-
To find your IONOS region’s endpoint, go to: https://docs.ionos.com/cloud/storage-and-backup/ionos-object-storage/endpoints
- Copy the endpoint URL and paste it to a notepad or other document as you will need it when you configure the connection in Bocada Cloud.
B - Generate an IONOS Object Storage Access Key & Secret
- In IONOS Cloud, click on the three lines (hamburger menu) on the top left corner of the screen.
- Navigate to “Storage & Backup”, then "IONOS Object Storage"
- Click on the “Key Management” tab
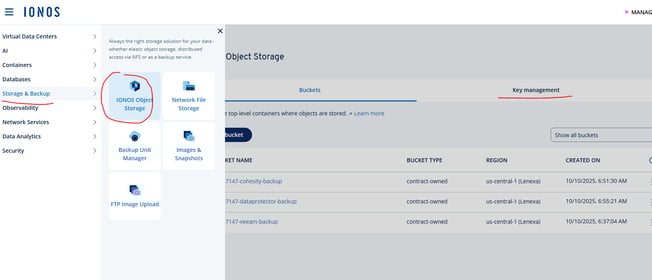
- Click on the “Generate a key” button, then click “Generate”.
- Your newly created access key should appear below the “Generate a key” button.
- COPY the Access Key and Secret and paste them to a notepad or other document as you will need it when you configure the connection in Bocada Cloud.
C - Find your IONOS Account ID / Contract Number
- The Account ID is also referred to as the Contract Number.
-
Click your user profile icon (in the top right corner) to see the Contract Number.
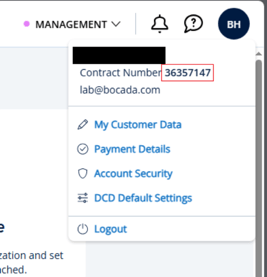
- COPY the Account ID/Contract Number and paste it to a notepad or other document as you will need it when you configure the connection in Bocada Cloud.
2 - Login to Bocada Cloud
- In Bocada Cloud's left navigation menu, select Connections, then +Add
- Click the "Storage Applications" tab, and/or click the tile called IONOS.
- Organization: this field will display if you have already created one or more organizations in Bocada Cloud to segment data by your customers, divisions or departments. It serves to associate the data from the IONOS connection with the appropriate organization for reporting purposes. If you haven't created an organization yet, the Organization field will not display.
- Connection Name: enter a name for this connection which will display in the Bocada Cloud UI as the name for this IONOS account. You can name it whatever you like; we recommend including a reference to the account name.
- Endpoint: enter / paste the IONOS S3 endpoint URL for your region (that you copied above in Step 1-A).
- Access Key: enter / paste the Access Key you copied in Step 1-B above.
- Secret: enter / paste the Secret you copied in Step 1-B above.
- Account ID / Contract Number: enter / paste the Contract Number you copied in Step 1-C above.
- Collect Costs: select whether you want to collect IONOS billing cost data or not (it is defaulted to No).
3 - Test Connection
Click the Connect button to test the connection between Bocada Cloud and IONOS.
If the connection is successful, data collection will begin and you will be able to see results in the Storage Utilization and Cloud Storage Costs reports. Then, the connector will run data collections every hour after that point.
If the connection is unsuccessful, you will be able to click the “Previous” button to edit your connection details and try again.
4. View Your Storage Data
Click here to learn more about your storage data in Storage Reports
If you have issues connecting to IONOS after trying these steps, create a Support Ticket in Bocada Cloud, or contact us.