Bocada Cloud has integrated with HaloPSA (SaaS version) using their published REST API to automatically generate a ticket when a backup job and/or data collection monitored by Bocada Cloud fails. To configure the integration, follow the steps below.
1. Add a Ticketing Integration to HaloPSA in Bocada Cloud
- In the Bocada Cloud left navigation menu, select Administration > Ticketing Integrations > +Add and then click the HaloPSA tile.
- Display Name field: enter a name for the connection to HaloPSA which will be displayed in Bocada Cloud. You can name it whatever you like; we recommend it references the “friendly name” you use to refer to the HaloPSA instance.
- Base URL field: enter the URL of your HaloPSA instance. For example, an organization called "Acme" would have a base URL of: https://acme.halopsa.com
- Agent Email field: enter the email of the HaloPSA agent that was used to create the application client. This must be a valid email address of a HaloPSA user. We recommend that it's the same individual you will select as the Agent to login as in step #12 below when creating the new API application.
- Client ID & Client Secret: follow the steps below in #2 (Log into your HaloPSA instance) to generate a Client ID & Client Secret that you will use for these two remaining data fields.
2. Log into your HaloPSA instance
While keeping Bocada Cloud open, log into HaloPSA in another browser or browser tab to create a Client ID & Client Secret which are required fields for the integration to be completed.
- Click Configuration on HaloPSA's left navigation menu.
- Enter API into the search field at the top of the page.
- Click the HaloPSA API button.
- Click the View Applications button.
- Click the New button in the top right corner of the screen to create a new application to connect to Bocada Cloud.
- On the Add an Application page, you will be on the Details tab.
- Enter an Application Name, such as Bocada Cloud.
- The Active checkbox should be checked.
- Under Authentication method, select the Client ID and Secret (Services) radio button
- You will see a Client ID displayed – copy and paste this into the Client ID field in Bocada Cloud.
- You will see a Client Secret displayed – copy and paste this into the Client Secret field in Bocada Cloud. DO NOT CLICK THE SAVE BUTTON before you paste the Client Secret into Bocada Cloud as it will disappear from the screen after it is saved.
- You will see a Login Type field - ensure that Agent is selected (default)
- In the Agent to log in as field, select a user that has permission to view and create tickets.

- Now, click the Permissions tab at the top of the screen. Check the following three checkboxes: read:tickets, edit:tickets and read:customers

15. Scroll down and click the Save button.
3. Complete Integration Fields
Navigate back to Bocada Cloud and ensure all fields on the ticketing integration page are filled in:
- Client ID - enter the Client ID you created using the instructions above.
- Client Secret - enter the Client Secret you created using the instructions above.
- Allow Auto-Closing of Tickets - this is an optional checkbox you can select if you would like Bocada Cloud to automatically close a ticket it opened when a backup or data collection failure previously identified is resolved. It is recommended to select this option to avoid unnecessary ticket "noise."
4. Verify the Connection
- Next, click the Verify Connection button so that Bocada Cloud can test the connection to your HaloPSA system using the credentials you entered. If the connection is successful, it will move on to the next step (Discover & Map Tenants). If not, it will ask you to verify the integration data fields you entered to ensure they are correct.
5. Discover & Map Tenants
- Bocada Cloud's two-way integration will automatically discover the tenants (customers) you've set up in HaloPSA and pull them into Bocada Cloud to match to the Organizations you have set up in your account. This ensures that tickets generated will automatically be associated with the correct customer tenant in HaloPSA.
- Bocada Cloud will attempt to match an Organization name to each customer tenant name from HaloPSA. If so, it will show it as "Mapped" but you can change that if needed. If it can't make a match, it will display as "Not Mapped" and you can then elect to map it by selecting the correct tenant from the drop-down menu. See the screen shot below for an example.
Note: it is recommended to set up all of your Organizations in Bocada Cloud first to ease the mapping process with your HaloPSA tenants.

6. Create Sample Ticket
- Next, Bocada Cloud will attempt to create a sample ticket in your HaloPSA system so you can verify the integration i
- Select which Tenant (Customer) the sample ticket should be delivered to in HaloPSA. This is used to check that the integration is working.
- In the future, if a ticket is generated that isn't matched with a HaloPSA tenant, then it will be associated by default with the tenant entered during this step.
- Click the Verify connection and create a sample ticket button.
- If successful, you will see a confirmation message and test ticket number. Look in HaloPSA to verify the ticket has been created.
- If your HaloPSA system requires additional fields for a ticket to be successfully created, Bocada Cloud may not be able to create a sample ticket at this step and will notify you in the UI. You will be able to test that a sample ticket can be created when setting up a ticket trigger.
- After the integration is verified, you will be able to create ticket trigger(s) as described in step 5 below. That way, tickets created because of a backup or data collection failure will be associated with the correct customer in HaloPSA.
- If you receive an error message after trying to verify the connection, review the data you entered to make sure it is correct. If you are still experiencing issues, create a support ticket in Bocada Cloud to get additional help.
7. Set up and Save a Ticket Trigger
Immediately after creating a successful integration with HaloPSA, Bocada Cloud will prompt you to set up a ticket trigger (click the Set up a Ticket Trigger button on the confirmation page).
Or, if you would like to configure a ticket trigger later, on the left navigation menu, select Administration > Ticketing Integrations > List and click the Add Ticket Trigger icon for the HaloPSA integration you just set up (see screen shot below).

Note: the HaloPSA ticketing integration in Bocada Cloud supports multi-tenancy, which means you can create a single integration and then set up triggers for tickets to be automatically associated with the correct customer tenant in HaloPSA .
Ticket Name & Parameters
1 - Trigger Name - create a name for this ticket trigger which will display in the Bocada Cloud UI. You can create multiple triggers for the same HaloPSA integration; therefore, enter a name that will describe the type of trigger you are setting up (e.g. "Backup job failures").
2a - Parameters: Organizations - select the Organization(s) this trigger will be set up for:
-
If you want the ticket to be created when there is a failure for a resource in any organization you've set up in your Bocada Cloud account, select "All Organizations." Selecting "All Organizations" is recommended.
-
If you want the ticket to be created when there is a failure for a resource in a specific organization, select "Specific Organizations" and then choose the organization.
2b - Parameters: Connections - choose whether the ticket trigger will apply to all or only specific connections to your backup applications. Selecting "All Connections" is recommended.
2c - Trigger: Type - select whether this ticket trigger will be generated based on a Bocada Cloud Data Collection Failure or a Backup Job failure. If you are subscribed to the Ultimate plan or are in your free trial period, you can also generate a ticket for In-Progress jobs or Disabled Veeam backup jobs. Learn more.
-
Note: you can set up multiple ticket triggers for a single integration with HaloPSA. Once you create a trigger for one type of failure, you can add another trigger for a different type of failure.
2d - Trigger: # - select how many consecutive attempts before the ticket is generated (e.g. a backup job fails 3 consecutive times and then a ticket is generated in HaloPSA).
2e - Ticket Grouping - these options give you greater control and flexibility in terms of how you would like the tickets to be generated to match your operational workflow. For example, you can group backup failures into a single ticket, or generate individual tickets for every failure.
3a - Ticket Creation: Ticket Integration: this drop-down field will default to the HaloPSA integration you selected.
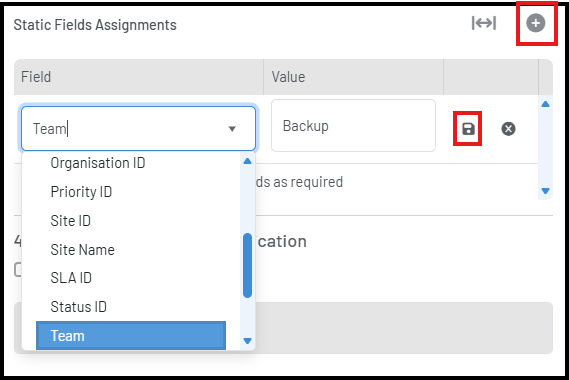
3b- Status Fields Assignments - optionally, when the ticket is created in HaloPSA, you can choose to auto-populate static data fields in the ticket with specific values.
-
Click the + icon on the top right to add a static field
-
Select the field you want to auto-populate from the drop-down list.
-
Then in the Value field, enter the data you want to auto-populate
- Finally, click the Save icon to save it.
Note - exact match: the static data field value you enter in Bocada Cloud must match exactly what is in HaloPSA application for it to work correctly.
Note - Client ID and Site ID: this integration supports the mapping of HaloPSA tenants to Bocada Cloud organizations so that it automatically associates tickets with the correct customer tenant. That way, you don't have to create a ticket trigger for each customer. However, if you elect to create a ticket trigger for each customer and enter a Client ID for each one, then that will take precedence over the automation done by Bocada Cloud and Client ID will be used.
Additionally, if you set up the Client ID and Customer Name static fields, the Client ID field will override and be used. Similarly, if you set up the Site ID and the Site Name static fields, the Site ID field will be used.
You can find a specific Client ID and Site ID by accessing them in the HaloPSA.
4 - Ticket Creation Failure Notification - optionally, you can choose to receive an email notification if the creation of a HaloPSA ticket fails. If you select this option, enter the email address(es) of the recipients of the notification. If there are multiple recipients, separate their email addresses with commas.
10 - Save the trigger - click the Save button to save the ticket trigger. It is recommended to save the trigger before creating a test ticket. Once saved, the trigger will appear on the Administration > Ticketing Integrations > List page, under the HaloPSA connection. Click the down arrow to display the list of ticket triggers as in the screen shot below.

11 - Create Test Ticket - once you have saved the ticket trigger, you can test it to make sure it's functioning correctly. Edit the trigger by clicking the pencil icon (as seen in the first screen shot below). Then click the Create Test Ticket button at the bottom of the panel to check that the integration and ticket creation process is successful (second screen shot below).


Note - Updating Tickets: Rather than generating a ticket every time the ticket trigger rule is met, Bocada Cloud will update the original ticket if there is a subsequent failure for the same resource. It will not generate multiple tickets for the same failure on the same resource to avoid unnecessary "noise" in your ticketing system.
Note - Auto-Closing Tickets: if you have chosen to have tickets automatically closed (an option on the HaloPSA integration configuration page), then Bocada Cloud will close a ticket it created for a failure if that failure is resolved on a subsequent attempt. Auto-close is only available to customers subscribed to the Ultimate plan.
If you have any issues or questions about integrating with HaloPSA, create a support ticket in Bocada Cloud or Contact Us.